Posts Tagged ‘how to’
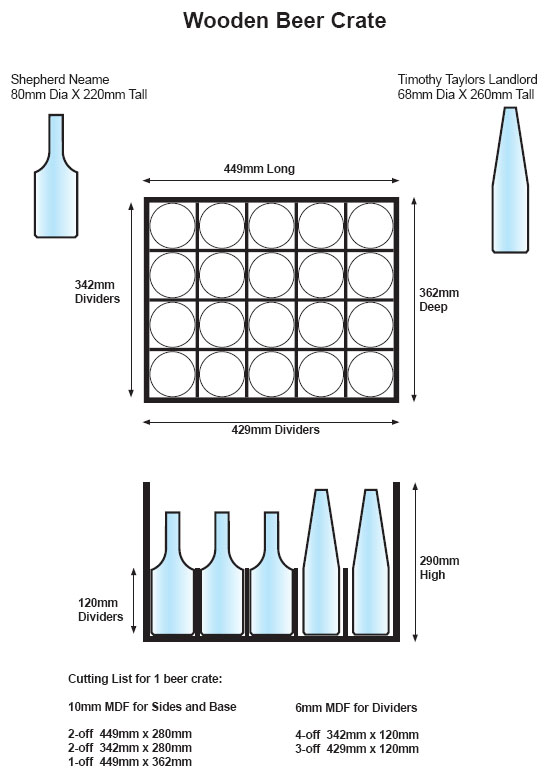
It seems beer bottle crates for Home brewing are like gold dust, rocking horse poo, and sparrows teeth! So I thought I’d draw some plans up with a view to having a go at building some. 🙂
The Shepherd Neame bottles are the biggest diameter ones I have and the Timothy Taylors bottles are the tallest so I’ve designed this crate to accommodate both, using a diameter just 1 mm of space bigger than the larger dia Shepherd Neame bottle but setting the Dividers out so that there is an 81 mm square with 6 mm MDF dividers, if you want a little more room use 4 mm MDF instead. Click here to download the PDF to print out

Click here to download the PDF to print out
*Disclaimer, I’ve not actually made these yet so please check your bottle sizes, thanks.
After seeing other peoples shots of dark places such as drains and tunnels, I decided to have a go for myself.
So experimenting with long exposures, 30 seconds and longer, and a mid range aperture in a couple of disused railway tunnels.

All Rights reserved © Copyright of pdtnc
Setting the Camera
With long exposures you need to keep your camera shake free so the use of a Tripod and cable release is essential, I picked my shot and set my camera in the dark getting focus manually on long shots and shooting off a flash shot to attain focus on closer in shots (Switching to manual focus once happy so as to lock it at that distance).
I was shooting in the camera’s Manual Mode so as to set exposure time to the ‘BULB’ setting, I chose an aperture of F8 so depth of field would be mid range for my lens, I set the camera ISO to 100 so as to keep down the possibility of digital noise showing up (Other ISO setting could be used while practicing and getting the hang of how long the exposure would take).
So I’m focused, my camera is on the tripod cable release attached, my camera setting are locked, it was time to click and lock the shutter release and start using the torch to light the scene.
Lighting with the Torch
Using the torch its a case of literally painting the subject with light where you want the camera to ‘see’ and capture what you want, it takes some experimenting and can be an interesting way to be creative with lighting your photograph. Its important to keep the torch beam moving on your subject so as to avoid ‘hot spots’ where too much light could over-expose, paint evenly and try not to miss the bits that interest you.
I started with 30 second exposures and went up to 2 minutes 30 seconds on some shots where I didn’t want to use to much direct light so I could get a more creative effect, this will all depend on the brightness of your torch or torches.
A handy tip would be to leave a small dim light under your tripod so you don’t go walking into it while making a shot.
Using more than one torch can give you the option of back lighting an object and also painting the foreground with the other torch, coloured gels can be used over the torch beam if you fancy adding a little extra colour to your subject.
Light trails are fun, and can be a happy accident while lighting your subject and add a bit of excitement and movement to the scene, though if you don’t want the trails be careful that the line of sight between your torch beam and your camera is guarded and you wear dark or black clothes so you don’t show up in your own shots.
For most of my experimenting I stayed behind the camera, though I started venturing out further to see what else was possible which is well worth it.
Safety and Darkness
Standing in almost complete darkness with just a flashlight might be an eerie experience for some people so its always best to take a friend and tell someone else where you are going and how long you will be there. For me the excitement of creating some amazing photographs out weighs any fear I might have had, I found the darkness and torch light quite calming with the silence only broke by the dripping from the ceiling of the tunnel and its ventilation shafts. It always good to watch where you are putting your feet while setting up shots as uneven floors and obstacles could trip you up, so be careful, safety first!

All Rights reserved © Copyright of pdtnc
Equipment
The Camera equipment used was as follows; Canon 400D, Sigma 10-20mm lens, Tripod, Remote shutter release cable. The Torches used were; Maglite 3D-cell with Terralux LED upgrade, Fenix TK10, and some other cheaper LED torches, I also took a couple of Glow-sticks.
Links
More of my tunnel photos are at www.flickr.com/photos/pdtnc
If you liked this and found it useful please go vote for it at http://www.jpgmag.com/stories/6108


You must be logged in to post a comment.